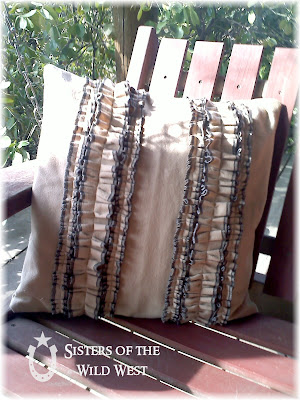
Anthropologie Knock-Off Pillow Tutorial
I was inspired by a pillow that I saw on Anthropolgie. But..with a $58 price tag I decided to make my own.
Here is their pillow
I started with a 20 in square of some tan flannel. I wanted the pillow to be soft AND pretty. I also cut two pieces for the back. One was 20x 14 and the other was 20x11 so they would overlap in the back so that I could insert the pillow. I got my pillow insert at Hancocks on sale 50% OFF!
I then began cutting my strips for my ruffles with my lovely assistant, miss Lola Blair by my side (24/7).
I cut them the width of the fabric with is about 44 and I cut some 3/4 in 1.5 in and 2.5 in.

I serged both sides of each strip with black thread. I then sewed a basting strip down the center of each and gathered each strip until it was only 20 in.

I pinned the 2.5 in strips in place first. I placed them 6in. from the sides. I then sewed them in place.

I then pinned the second row of 1.5 in strips in place. I decided not to use the smallest stips I cut. I didn't like how they looked.

After they are all sewn in place lay your back pieces with right sides together on tip of the ruffled side. I put a 1in hem in each of the exposed sides. Lay down the 10x20 in piece first.

Then lay down your 14x20 in piece over the top of that.

Turn pillow right side out. Remove basting stitches and insert pillow. My pillow was an 18x18in square.
Tuck pillow in and lay seams flat. And you are done!

Have a great day!!!


the pillow turned out beautiful .. love it
ReplyDeleteBEAUTIFUL! I am going to feature this tomorrow. Thanks for linking it up!
ReplyDeleteThis beautiful, saw it on naptime crafters. Great job.
ReplyDeleteJust Another Day in Paradise
Lovely lovely love and so clever! I make ruffled tuxedo pillows like these out of muslin and sell them in my etsy shop. But it seems I can't let well enough alone, I add buttons and rosettes and generally keep fussing with them, lol. Love the serged edges in a contrasting color on yours!
ReplyDeleteThe pillow is beautiful...if only I wasn't so bad at sewing...
ReplyDeletethis pillow turned out amazing!! thanks for linking up to handmade tuesdays @ www.ladybug-blessings.com (p.s. make sure to enter my 500 follower giveaway, it ends tomorrow :)
ReplyDeleteI love it - you did a great job
ReplyDeleteLooks beautiful! I think it is better than their pillow! Thanks for linking this up as well.
ReplyDeleteVery cool! I love the serged sides...it's beautiful!
ReplyDeletehi Amy and Emily!
ReplyDeletewhen I saw a visit from "sisters of the wildwest" on my sitemeter I just had to pop over and see what this was about!! I am honored to be on your favorite blogs, thank you!
First y'all are so cute, and 11 kidos?! wow, I don't know how y'all have the time to brush your teeth much less have a blog!!
Love your talent with a sewing machine and that you think outside the box and figure out how you can do/make this/that- very creative. Love this project (cute assistant btw!)- it turned out so well.
I LOVE, LOVE that leather chair!
so great to meet you two!
fondly,
joan
Love that pillow!! Well done.
ReplyDeleteThis pillow is simply lovely! Terrific job.
ReplyDeletexoxo,
Amy
Another beautiful pillow! I just love the surged edges!
ReplyDeleteCarlee
www.ladybirdln.com
Pillows look fantastic, and your tutorial made it so easy. Thanks for posting.
ReplyDeleteAfter your basting stitch down the center and ruffling the strips, how do you sew those ruffled strips onto the pillow? Do you sew down the same ruffled seam in the center of each strip?
ReplyDelete